When you put a wallmount server chassis on the wall, you’re not just hanging metal. You’re hanging live data, maybe the whole company Wi-Fi, maybe an AI edge node. If the load-bearing and anchor design is wrong, even the best server rack pc case can end up on the floor.
So let’s talk about how to think like a “wall engineer” without turning this into a boring textbook.
Wall Type and Load-Bearing Capacity for Wallmount Server Chassis
Before you pick a shiny computer case server, you should ask one very simple question:
What kind of wall do I really have here?
In real projects you usually meet three kinds:
- Solid concrete or block – strong, stiff, happy to carry a heavier wallmount chassis.
- Brick wall – not all bricks are equal, some are hollow, some are soft, so you treat it a bit more careful.
- Stud + drywall – very common in offices and homelabs; the drywall skin itself is almost cosmetic for load.
If you screw a full server pc case only into drywall plugs, the install maybe looks fine on day one. A few months later, after more disks, more heat, a bit of vibration, small cracks start show. Not fun.
Good practice:
- aim your anchors into structure (concrete, brick, or studs),
- if studs are in bad position, mount a backing board first (thick plywood or steel plate),
- then mount the Wallmount Case from IStoneCase or your chosen chassis onto that board.
The wall becomes part of the system design, not just a background.
Total Load Calculation for a Wallmount server pc case
The wall doesn’t know product names. It only feels weight and leverage.
For any wallmount server rack pc case, add up:
- the empty chassis,
- drives, PSUs, fans, rails, maybe GPUs if it’s a compact GPU server case from IStoneCase,
- cable bundles and small gear sitting or hanging on it,
- people pulling patch cords, slamming doors, sometimes leaning on the box (yes, it happens).
Don’t just count today’s config. Think like this:
- “If I fill all bays later, how heavy it goes?”
- “Will we add a small UPS on the same wall panel?”
- “Will we use denser disks or more powerful CPU in next refresh?”
A simple rule of thumb: design your anchors and wall structure with extra headroom. Not exact numbers here, but if the system grows, you still feel relaxed. If the load works only in perfect condition, it’s already too close.
Anchor Design and Anchor Layout for Wallmount Server Chassis
Anchor Types for Concrete, Brick and Stud Walls in a server rack pc case setup
Now we know the wall and the weight. Next pain point is anchor choice.
For a wallmount computer case server, you normally see:
- Concrete or solid block
- use sleeve anchors, wedge anchors, or chemical anchors,
- drill the right diameter and depth, clean the dust, tighten to spec.
- Brick wall
- choose anchors that are rated for the brick type,
- avoid weak joints, stay away from corners.
- Stud + drywall
- find studs with a proper detector, not just knocking with fingers,
- use lag screws with enough length into wood or metal studs,
- if you can only hit one or two studs, add a backing board across several studs.
Drywall-only toggles are OK for small switches or Wi-Fi units. For a loaded atx server case with full drives and strong PSU, that’s asking for trouble.
This is where a vendor like IStoneCase helps: their Server Case and Wallmount Case lines are built with sensible mounting ears and hole patterns, so your anchors and their chassis actually cooperate instead of fighting each other. You can check options on Server Case and match them to the wall structure you have.
Anchor Layout, Backing Board and Safety Factor for Wallmount Server Chassis
Anchor layout is not only “four screws somewhere.” It controls how the load spreads over the wall.
Typical field logic:
- use at least four main anchors for a serious wallmount server chassis,
- put them wide apart, both horizontally and vertically,
- keep enough distance from top, bottom and side edges of the wall,
- try to line the anchor pattern with the center of mass of the loaded chassis.
Real rooms are messy. Stud spacing is odd, old brick is not perfect, the cable ladder wants the rack shifted by a bit. That’s why many installers love a backing board:
- fix a strong board into many studs or solid points,
- then mount the chassis onto the board with shorter screws,
- now the load is shared and you have freedom to adjust the final position.
On top of that, crews usually build in a safety factor. You don’t run anchors at their absolute limit. You leave margin for vibration, temperature swings, and small mistakes. This is cheap insurance compared with one fallen node.
Practical Load-Bearing Data Table for Wallmount Server Chassis
Here’s a simple cheat table you can drop straight into your design doc or project note.
| Design Aspect | Typical Practice for Wallmount Server Chassis | What You Double-Check |
|---|---|---|
| Wall type | Concrete or strong brick for heavy builds; studs + backing board for drywall installs | Confirm real wall structure on site, not only on drawing |
| Total load | Count chassis, full drive set, PSUs, fans, rails, plus growth | Re-check when hardware team adds “just a few more drives” |
| Anchor type | Concrete → sleeve / wedge / chemical; brick → brick-rated plugs; studs → lag screws | Match anchor spec to wall material and expected load range |
| Anchor layout | Minimum four anchors, wide spread, good edge distance, center of mass roughly inside | Compare chassis hole pattern with stud layout or backing board |
| Backing board | Thick plywood or steel plate when studs are not in right position or wall feels weak | Fix board firmly first, then mount the server pc case on top |
| Safety headroom | Treat anchor system as stronger than max expected real load | If numbers start feel “too close”, you redesign, not ignore |
No need for exotic math here. This table just keeps the team from “eyeballing it” during a rushed night install.
Real-World Wallmount Server Chassis Scenarios and Use Cases
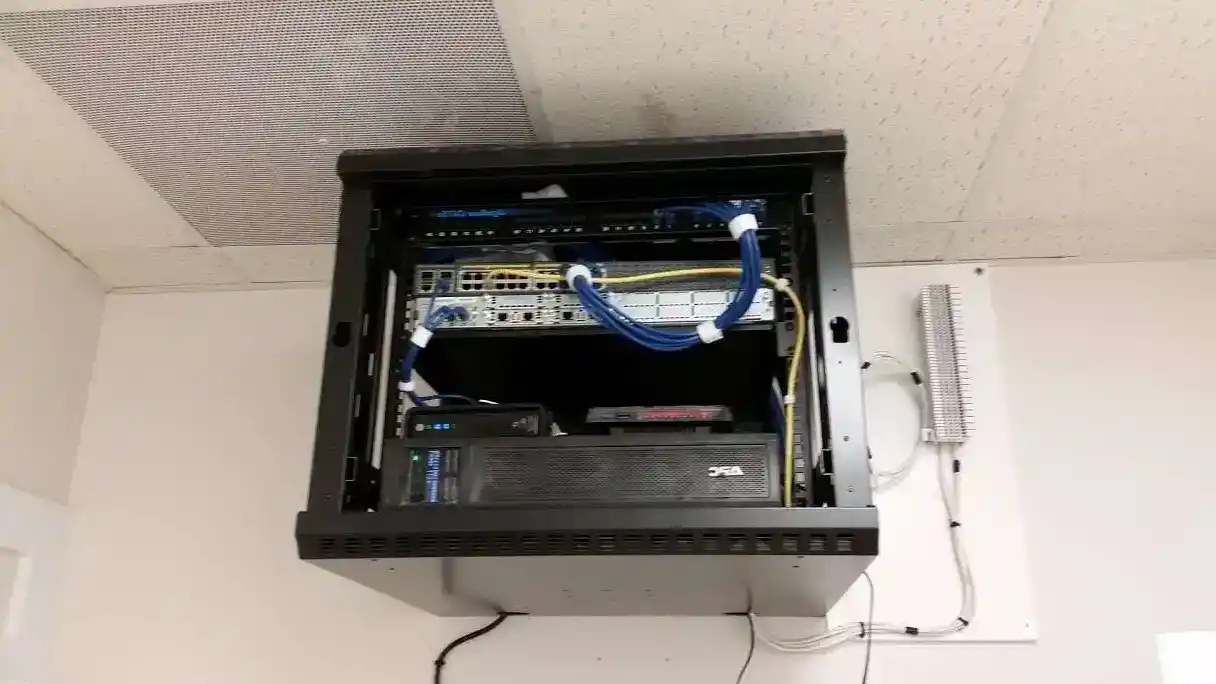
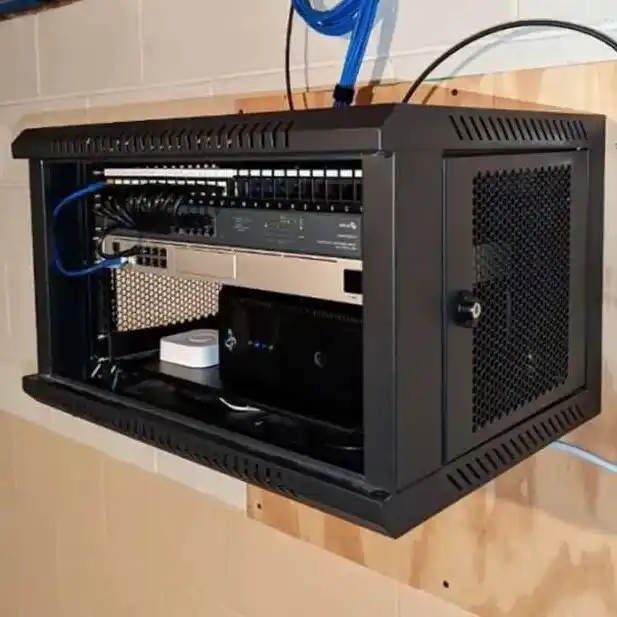
Small Office Network Closet with Wallmount Case
Think about a tiny network closet: one wallmount chassis, a PoE switch, patch panel, maybe a small NAS Devices unit from IStoneCase. At first this look like a light job. In reality you have:
- all staff’s traffic going through that corner,
- more and more cables every quarter,
- people opening the door, sometimes a bit hard, sometimes bumping into the gear.
If the Wallmount Case sits on a weak anchor set, heat, weight and vibration slowly eat the structure. You start see misalignment, weird noise, even hairline cracks on the wall.
With proper load-bearing design:
- you choose a solid short-depth server rack pc case,
- hit studs or concrete with clean anchors,
- leave space to open the door and service drives without putting body weight on the chassis,
- keep cable management on rails instead of hanging on network ports.
Result: the “small closet” behaves like mini data center, not like a temporary hack.
Edge AI or Branch Node Backed by Rackmount and NAS Gear
Now switch to a factory or store. You mount an edge AI node on the wall, feeding a Rackmount Case cluster in a nearby room and pulling data from local storage. Sometimes the edge box itself is a compact atx server case with GPU and NVMe. You might even mix a wallmount chassis with an ITX Case for gateway work.
Here the environment is tougher:
- vibration from machines,
- dust and warm air high on the wall,
- people passing close with carts or tools.
If load-bearing is weak, a small impact can start a crack. If anchor layout is smart, backing board is strong, and the chassis shell is stiff, the system feels like it belongs there.
This is where IStoneCase’s broader line helps: you can combine a wallmount node, a Rackmount Case backbone from Rackmount Case and proper Chassis Guide Rail to build a full stack that survives real life, not only lab tests.
IStoneCase Wallmount Case and OEM/ODM Support for Load-Bearing Design
IStoneCase positions itself as “The World’s Leading GPU/Server Case and Storage Chassis OEM/ODM Solution Manufacturer.” That’s not only marketing words. For load-bearing and anchor design it means:
- their server pc case, GPU server case, Rackmount Case, Wallmount Case, NAS Devices, and ITX Case families share a clear mindset: strong frame, reasonable weight, and mounting points that make sense on real walls,
- if you order as OEM/ODM, you can ask for custom hole patterns, thicker mounting ears, special brackets, or extra side flanges to match your local anchor standards or special walls,
- bulk buyers and wholesalers get chassis that are ready for repeatable installs, so field teams spend less time “fixing the wall” and more time delivering services.
For data centers, algorithm centers, MSPs and even enthusiastic developers, this is direct business value: fewer site failures, fewer truck rolls, better uptime. The wallmount server chassis stops being a risky corner, and becomes just another reliable part of your infrastructure stack.
In short: treat load-bearing and anchor design as part of the spec, not an afterthought. Choose the right wall, calculate real load, pick proper anchors, and work with a chassis vendor who actually understands these details. Then your wallmount server chassis stays where it should be – quietly doing work, not trying to fall on somebody’s head.